Adjust frame-out positions
 | Right-click Appliqué > Appliqué to adjust frame-out settings. |
|---|---|
 | Right-click Appliqué > Appliqué without Holes to adjust frame-out settings. |
 | Use Reshape > Reshape Object to reposition frame-out marker. |
When stitching out appliqué objects, you can set a frame-out position after the guide run and/or tack stitch. This shifts the hoop out from under the needle, making it easier to place and trim the appliqué. Depending on the machine you are working with – multi-head or single-head – the frame-out command must be specified as a Stop function or Color Change respectively.
To adjust the frame-out position...
- Select the object and click the Reshape Object icon.
Control points appear along with the Reshape Views toolbar. Appliqué objects include a frame-out position marker. Show Entry/Exit Points must be activated to view it.
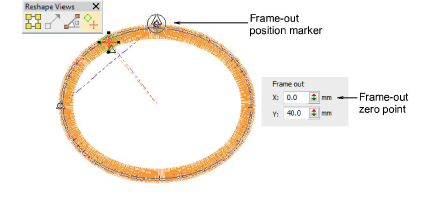
- Click and drag the frame-out marker to the required position.

- If you are using Object Properties, the Frame Out panel lets you specify frame-out coordinates in relation to the top center of the design, which is the zero point.