Create columns & borders
 | Use Traditional Digitizing > Column C to digitize columns or borders of fixed width. Right-click for settings. |
|---|
Digitize columns and borders of fixed width with the Column C tool.
To create columns and borders...
Insert some artwork to use as a digitizing backdrop.
Select a color and stitch type – e.g. Satin.
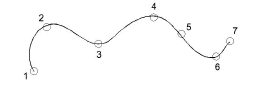
Select Column C and mark corner or curve points around the outline of the shape.
- Click to enter corner points.
- Right-click to enter curve points.
TIP
The Show Column C width guide setting in the Options dialog activates a special cursor. This is useful when digitizing a border based on a background image.
To close the shape, enter the last point on top of the first.
Press Enter.
Specify column width:
- To use the default width – as set in the Object Properties > Special > Column C docker – press Enter.
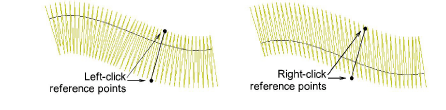
- To specify a width, mark two additional points. By default, stitches are positioned around the center of the digitized line.
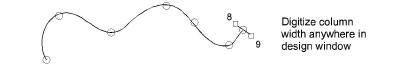
- To specify an offset, right-click reference points instead of left-clicking.
- Press Enter to finish.