Insert bitmap images
 | Use Standard > Import Graphic to import artwork into current design as a backdrop for manual or automatic digitizing. |
|---|---|
 | Use View > Show Bitmaps to toggle bitmap images on or off. Right-click for settings. |
Bitmap images of various formats can be imported or pasted into EmbroideryStudio for use as digitizing backdrops.
TIP
If you are editing images in a third-party graphics application, you can copy and paste into EmbroideryStudio via the Windows clipboard.
To import a bitmap image...
- Click the Import Graphic icon or select File > Import Graphic.
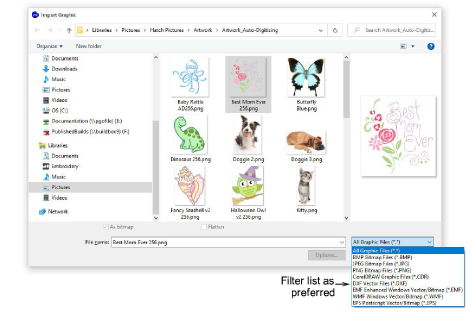
Navigate to the graphics folder. The dialog defaults to ‘All graphic files’ which displays all supported file types, bitmap and vector.
Filter the Files of Type list as required – e.g. ‘BMP’.
Note
While ‘All graphic files’ includes both vector and bitmap formats, for native CDR and other vector file types, use the CorelDRAW® Graphics Suite import function.
Select a file and click Open.
Scale and transform the image on-screen or via the Property and Transform toolbars.

TIP
Use Auto Trace To Vectors to create vector outlines from bitmap images. You can then convert these to embroidery objects using a variety of input methods. Auto Trace To Vectors can find holes in shapes – both inside and outside boundaries are detected.